 Slack
Slack GitHub
 Twitter
Documentation
About Kubeapps
Tutorials
- Get Started with Kubeapps
- Using an OIDC provider
- Managing Carvel packages
- Managing Flux packages
- Kubeapps on TKG
How-to guides
- Using the dashboard
- Access Control
- Basic Form Support
- Custon App View Support
- Custom Form Component Support
- Multi-cluster Support
- Offline installation
- Private Package Repository
- Syncing Package Repositories
- Using an OIDC provider with Pinniped
Background
Reference
About the project
Managing Carvel Packages with Kubeapps 
NOTE: This guide is about a feature that is under active development and, therefore, not yet ready for production use. The information herein stated is subject to change without notice until we reach a stable release.
Table of Contents 
- Introduction
- Installing kapp-controller in your Cluster
- Using Kubeapps for Managing Carvel Packages
- Conclusions
Introduction 
Historically, Kubeapps was initially developed to solely manage Helm Charts on your Kubernetes clusters. However, it has evolved to support multiple formats, such as Carvel Packages and Helm releases via Fluxv2 .
TIP: Find more information about the architectural evolution at this video and this technical documentation .
Carvel is often defined as a set of reliable, single-purpose, composable tools that aid in your application building, configuration, and deployment to Kubernetes. Particularly, two of these tools have paramount importance for Kubeapps: kapp and kapp-controller .
On the one hand, kapp is a CLI for deploying and viewing groups of Kubernetes resources as Applications . On the other hand, kapp-controller is a controller for managing the lifecycle of those applications, which also helps package software into distributable Packages and enables users to discover, configure, and install these packages on a Kubernetes cluster.
This guide walks you through the process of using Kubeapps for configuring and deploying Packages and managing Applications .
Installing kapp-controller in your Cluster 
NOTE: This section can safely be skipped if you already have kapp-controller installed in your cluster.
In order to manage Carvel Packages, first of all, you will need to install kapp-controller in your cluster. That is, applying a set of Kubernetes resources and CRDs.
According to the Carvel kapp-controller official documentation , you can install everything it kapp-controller requires just by running the following command:
kubectl apply -f https://github.com/vmware-tanzu/carvel-kapp-controller/releases/latest/download/release.yml
After running this command, you should have everything you need to manage Carvel Packages in your cluster. Next section will give you an overview of the relevant Custom Resources included in kapp-controller.
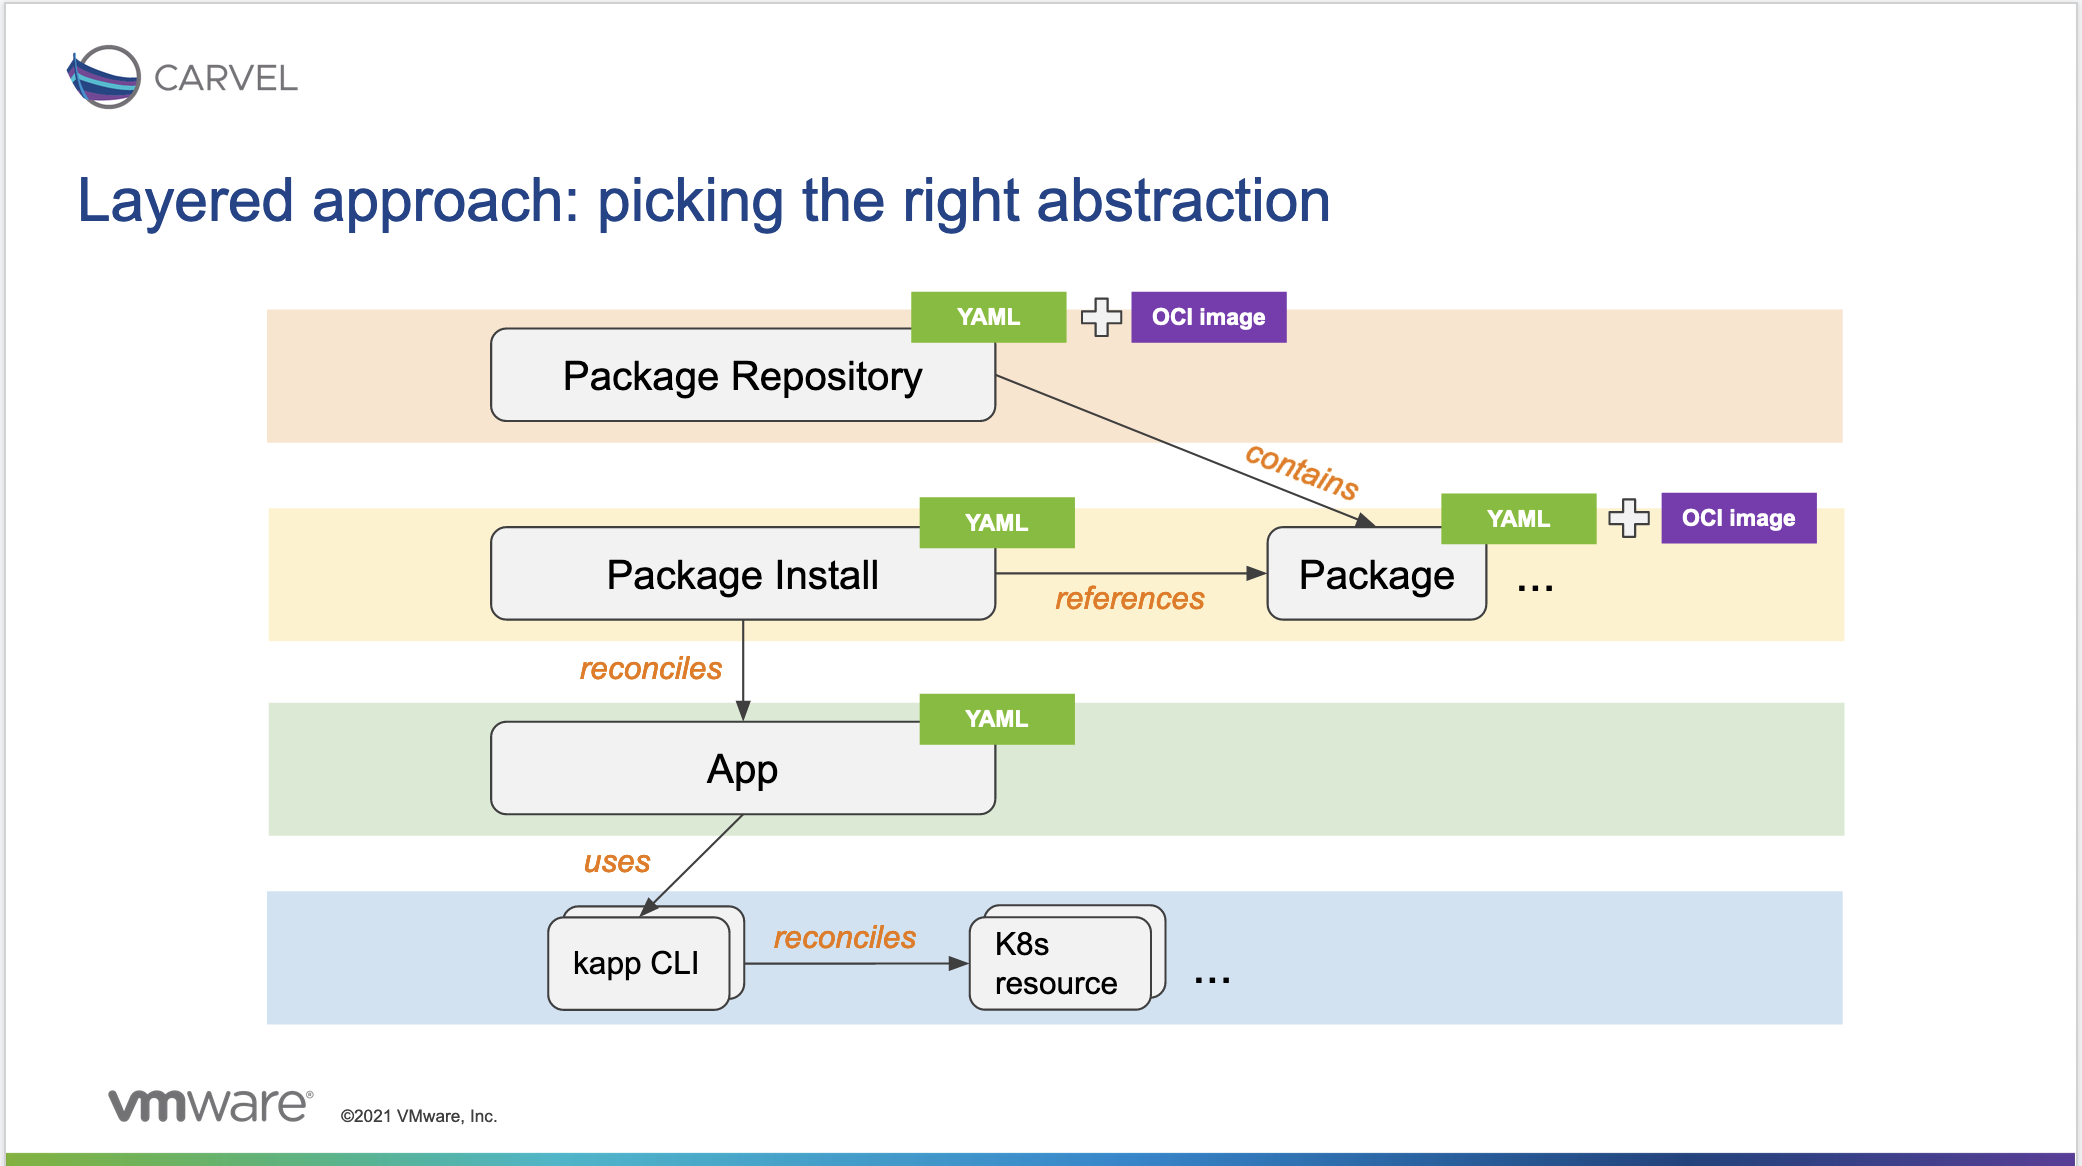
Quick overview of the kapp-controller CRs 
At the time of writing this guide, kapp-controller will install the following Custom Resources Definitions:
PackageRepository : is a collection of packages and their metadata. Similar to a maven repository or a rpm repository, adding a package repository to a cluster gives users of that cluster the ability to install any of the packages from that repository.
Package : is a combination of configuration metadata and OCI images that informs the package manager what software it holds and how to install itself onto a Kubernetes cluster.
PackageMetadata : are attributes of a single package that do not change frequently and that are shared across multiple versions of a single package. It contains information similar to a project’s README.md.
PackageInstall is an actual installation of a package and its underlying resources on a Kubernetes cluster.
App is a set of Kubernetes resources. These resources could span any number of namespaces or could be cluster-wide.
The following image depicts the relationship between the different kapp-controller CRs:
Using Kubeapps for Managing Carvel Packages 
Configuring Kubeapps to Support Carvel Packages 
As with any other packaging format, the kapp-controller support is brought into Kubeapps by means of a plugin.
This kapp-controller plugin is currently being built by default in the Kubeapps release and it is just a matter of enabling it when installing Kubeapps.
TIP: Please refer to the getting started documentation for more information on how to install Kubeapps and pass custom configuration values.
In the
values.yaml
file, enable the packaging.carvel option:
packaging:
  carvel:
    enabled: true
If required, you can additionally pass the following configuration values to modify the defaults used by Kubeapps for the Carvel support. These are options passed to the kapp-controller plugin that handles the Carvel packaging support:
defaultUpgradePolicy: represents the default upgrade policy for the packages. If other thannoneis selected, the kapp-controller will automatically upgrade the packages to the latest matching semantic version. For instance, assuming we installed the version1.2.3:- With
majorselected, the package will be upgraded to>=1.2.3, for example,2.0.0, for - With
minorselected, the package will be upgraded to>=1.2.3 <2.0.0, for example,1.3.0, - With
patchselected, the package will be upgraded to>=1.2.3 <1.3.0, for example,1.2.4,
- With
defaultPrereleasesVersionSelection: denotes the default behavior for installing prerelease versions (such as1.0.0-rc1). There are three possible values:null: no prereleases will be installed.[]: any prerelease version will be installed (if the versiondefaultUpgradePolicyallows it).["rc", "foo"]: only prerelease versions withrcorfooas part of their names will be installed (if the versiondefaultUpgradePolicyallows it). For instance,1.0.0-rc1will be installed, but1.0.0-barwill not.
defaultAllowDowngrades: is a boolean value that determines whether thekapp-controllerwill allow downgrades of packages.true: adds an annotation to everyPackageInstallresource created by Kubeapps that will allow them to be downgraded to previous versions of aPackage.false: is the default value and disables aPackageInstallto be downgraded to previous versions.
An example of the configuration values that can be passed to the kapp-controller plugin is:
kubeappsapis:
  ...
  pluginConfig:
    kappController:
      packages:
        v1alpha1:
          defaultUpgradePolicy: none # [ "major", "minor", "patch", "none" ]
          defaultPrereleasesVersionSelection: null # [ "null", "[]", "['foo']" ]
          defaultAllowDowngrades: false # [ true, false ]
Installing a Package Repository 
NOTE: Currently, Kubeapps does not offer any graphical way to manage Carvel Packages Repositories . Therefore, you will need to install the package repository manually.
Since we are actively working on refactor the Application Repository management in Kubeapps , Carvel Packages Repositories cannot be currently managed by Kubeapps. This section covers how to manage repositories manually.
First, you need to find a Carvel Package Repository already published. If not, you can always
create your own manually
.
In this section, we will use the Tanzu Community Edition package repository.
TIP: In this Carvel website you will find a list of Carvel Packages and Package Repositories that are available to open-source users.
Next, you need to create a PackageRepository CR in the global packaging namespace. This is done by running the following command:
cat > repo.yaml << EOF
---
apiVersion: packaging.carvel.dev/v1alpha1
kind: PackageRepository
  name: tce-repo
  namespace: kapp-controller-packaging-global
spec:
  fetch:
    imgpkgBundle:
      image: projects.registry.vmware.com/tce/main:0.9.1
EOF
Then, you need to apply the PackageRepository CR to your cluster using kubectl (or, alternatively, the kapp CLI), by running the following command:
kubectl apply --namespace kapp-controller-packaging-global -f repo.yaml
Under the hood, kapp-controller will create Package and PackageMetadata CRs for each of the packages in the repository in the global packaging namespace for kapp-controller, enabling those packages to be installed via Kubeapps in any namespace. Note you can instead install the repository in a different namespace if the packages should only be available for install via Kubeapps in a particular namespace.
TIP: Run
kubectl get packagerepository,kubectl get packagesandkubectl get packagemetadatasto get the created CRs.
Creating a service account 
Since the Carvel system reconciles a PackageInstall in the background, we need to create a service account to use when creating PackageInstall via Carvel. This service account is created in the namespace where you intend to install the package (specifically, where the PackageInstall resource will be created).
cat > kubeapps-user-service-account.yaml << EOF
---
apiVersion: v1
kind: ServiceAccount
metadata:
  name: carvel-reconciler
  namespace: kubeapps-user-namespace
automountServiceAccountToken: false
---
apiVersion: rbac.authorization.k8s.io/v1
kind: RoleBinding
metadata:
  name: carvel-reconciler
  namespace: default
subjects:
- kind: ServiceAccount
  name: carvel-reconciler
  namespace: kubeapps-user-namespace
roleRef:
  kind: ClusterRole
  name: admin
  apiGroup: rbac.authorization.k8s.io
EOF

kubectl apply -f kubeapps-user-service-account.yaml
Note that this service account will have admin access to the namespace only and so will be able to read/write most resources in the namespace, including adding other roles and rolebindings. If your package includes cluster-wide resources such as CRDs or ClusterRoles, you will need to update the above to use a ClusterRoleBinding with a different cluster role, such as cluster-admin. See
Kubernetes user-facing roles
for more info about the roles.
Installing a Package 
Installing a Carvel Package in Kubeapps is the same experience as installing any other package (such as a Helm Chart) in Kubeapps.
TIP: Please refer to the user documentation for more information on how to use Kubeapps as a user.
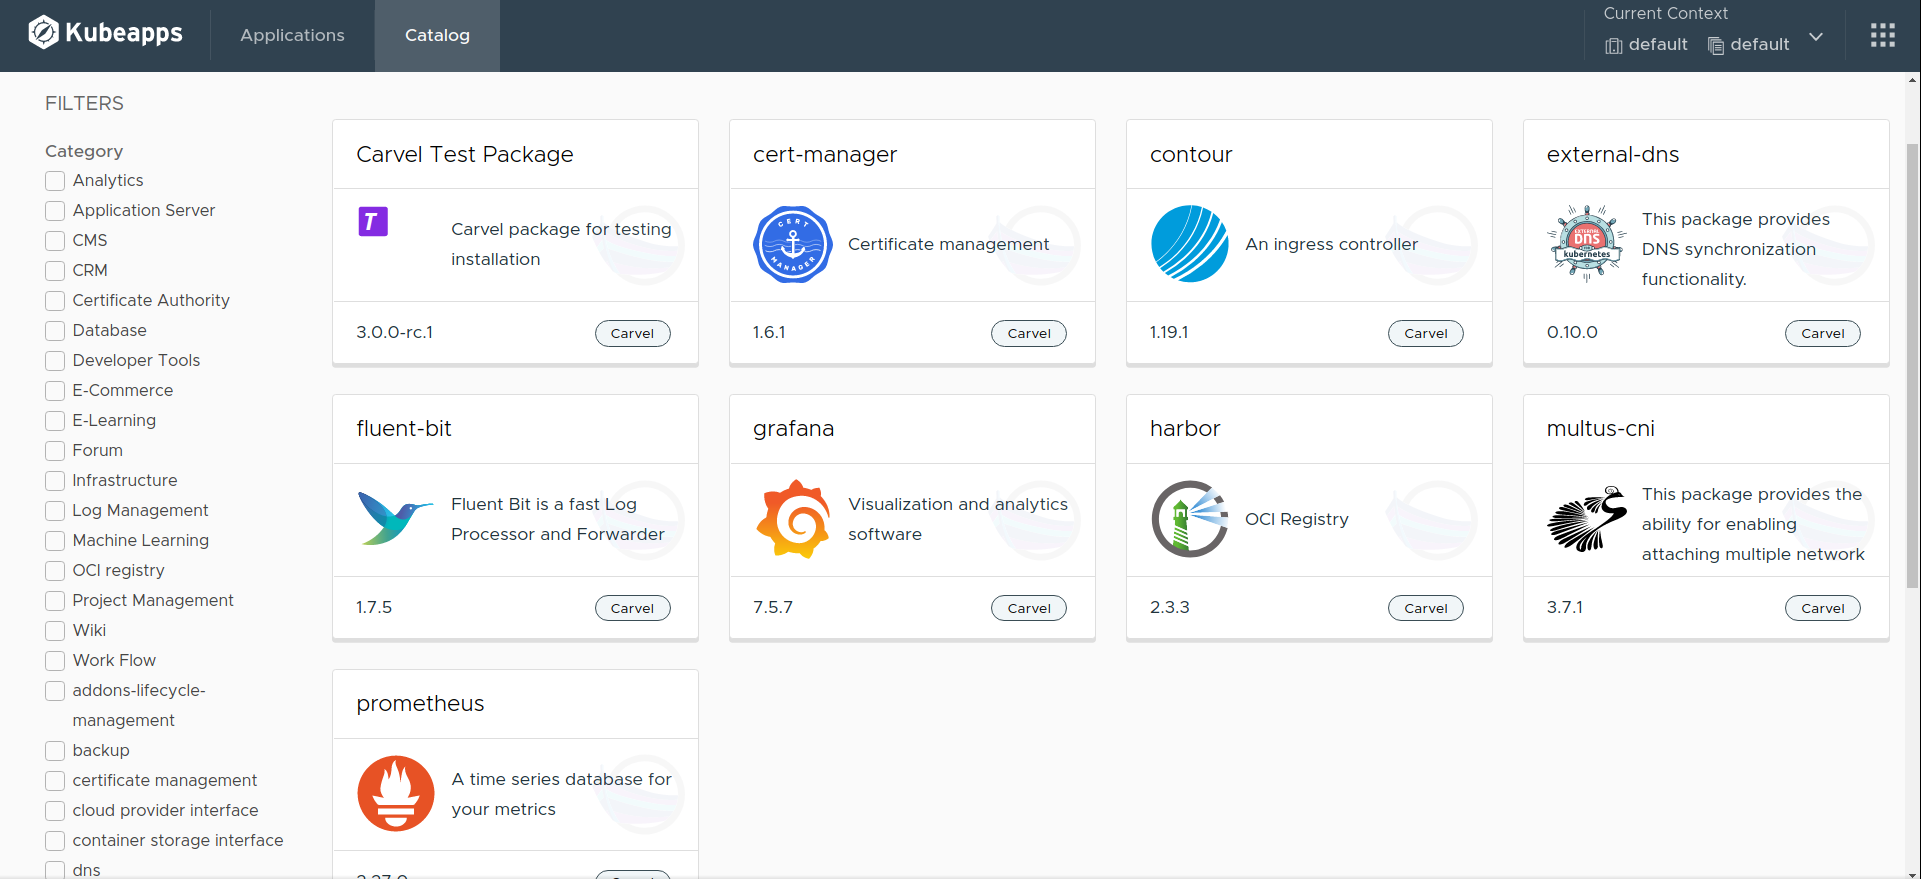
Assuming that a Package Repository, such as the Tanzu Community Edition, is already installed in the cluster, go to the Catalog tab and select the package you want to install.
The following image depicts the catalog page with a set of packages from the Tanzu Community Edition repository.
Next, select any package you want to install, for example, Harbor, as depicted below:
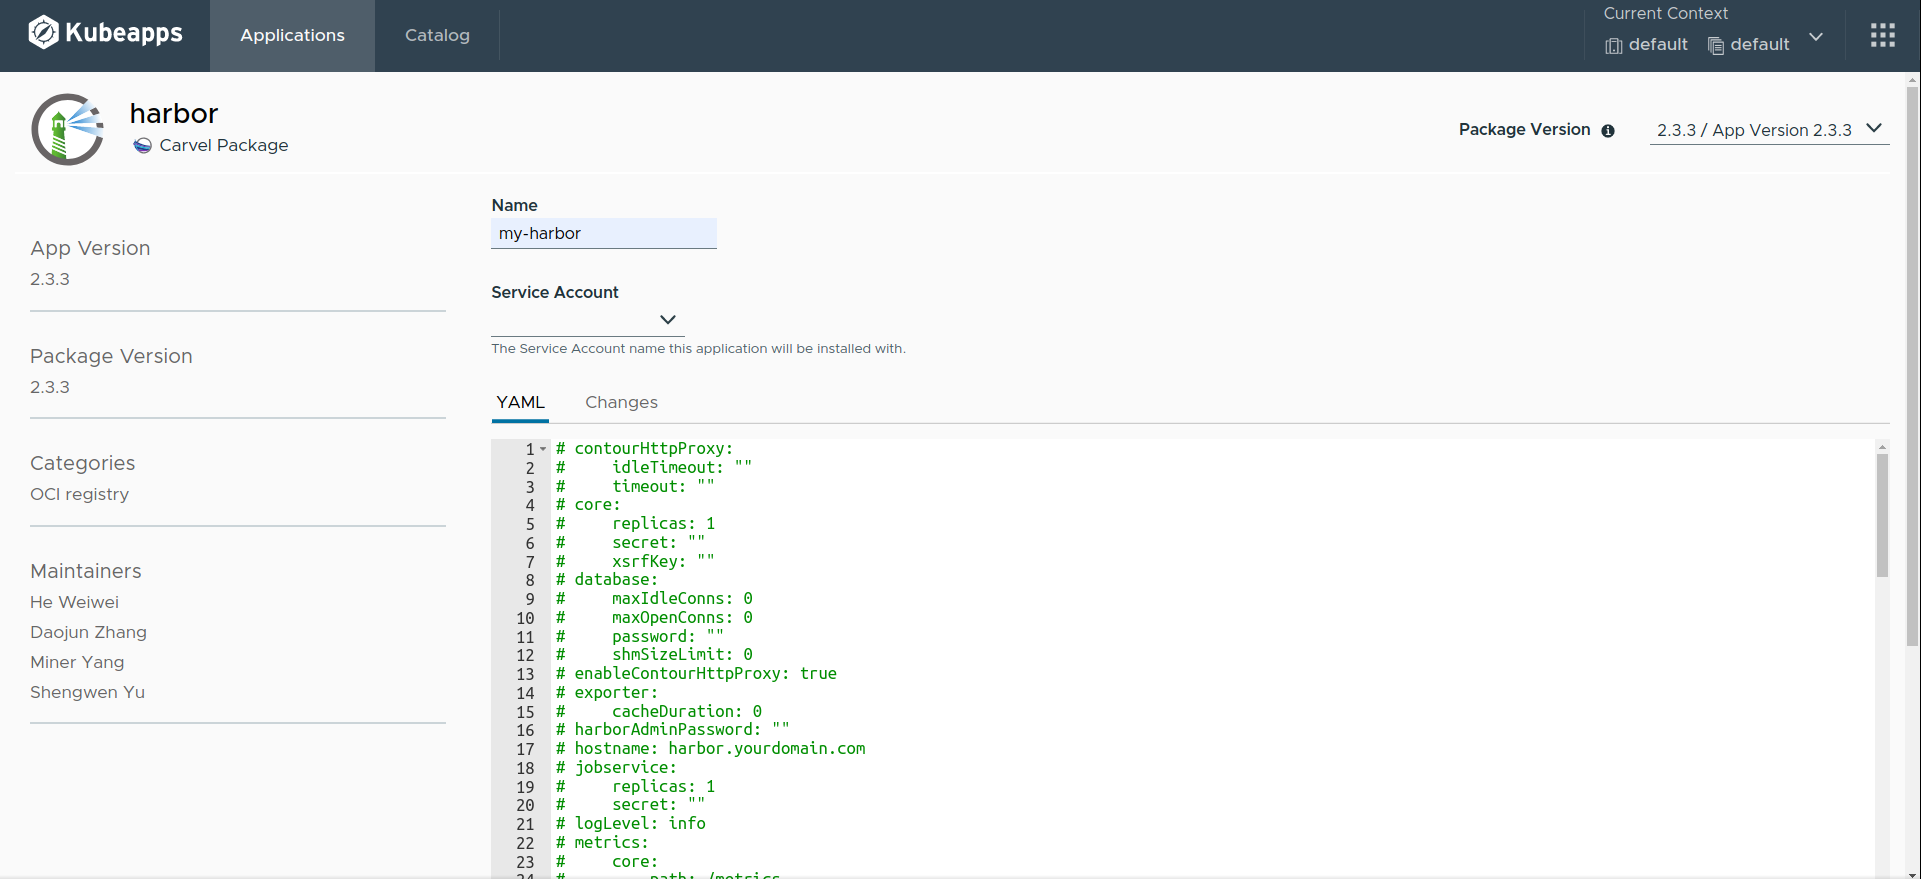
A big difference with respect to other packaging formats is that you must select a ServiceAccount to be used for installing the package.
The reason why is that kapp-controller forces to explicitly provide needed privileges for management of app resources.
TIP: Find more information about the kapp-controller security model in their official documentation .
In Kubeapps, a dropdown will allow you to select which ServiceAccount you want to use, such as the carvel-reconciler service account created above.
NOTE: As a consequence, the user logged in Kubeapps will need RBAC permissions to perform a
listoperation onServiceAccountobjects.
Furthermore, there is another difference: the values for installing the package are commented out by default. This this because there is no concept of default values in Carvel Packages.
In Kubeapps, we work around this decision by generating some default values based upon the OpenAPI Schema of the package.
TIP: For instance, a property
foo-propwhose data type isstringwill yield a default value offoo-prop: ""
TIP: you can uncomment a set of lines easily by selecting them and typing
Ctrl + /.
Finally, after clicking the Install button, the required CRs will be installed in the cluster (PackageInstall and the Secret holding the passed values).
At this moment, kapp-controller will perform the required actions to start creating the Kubernetes resources defined by the package. This process is known as reconciliation.
Viewing the Installed Packages 
Viewing the installed Carvel Packages in Kubeapps is the same experience as viewing any other installed package (such as a Helm Chart) in Kubeapps.
TIP: Please refer to the user documentation for more information on how to use Kubeapps as a user.
Go to the Applications tab to see every Application that has been installed in the cluster. Click on show apps in all namespaces to view the ones currently installed in every namespace of the cluster.
The following example shows an example of the Applications page with two Carvel Packages installed:
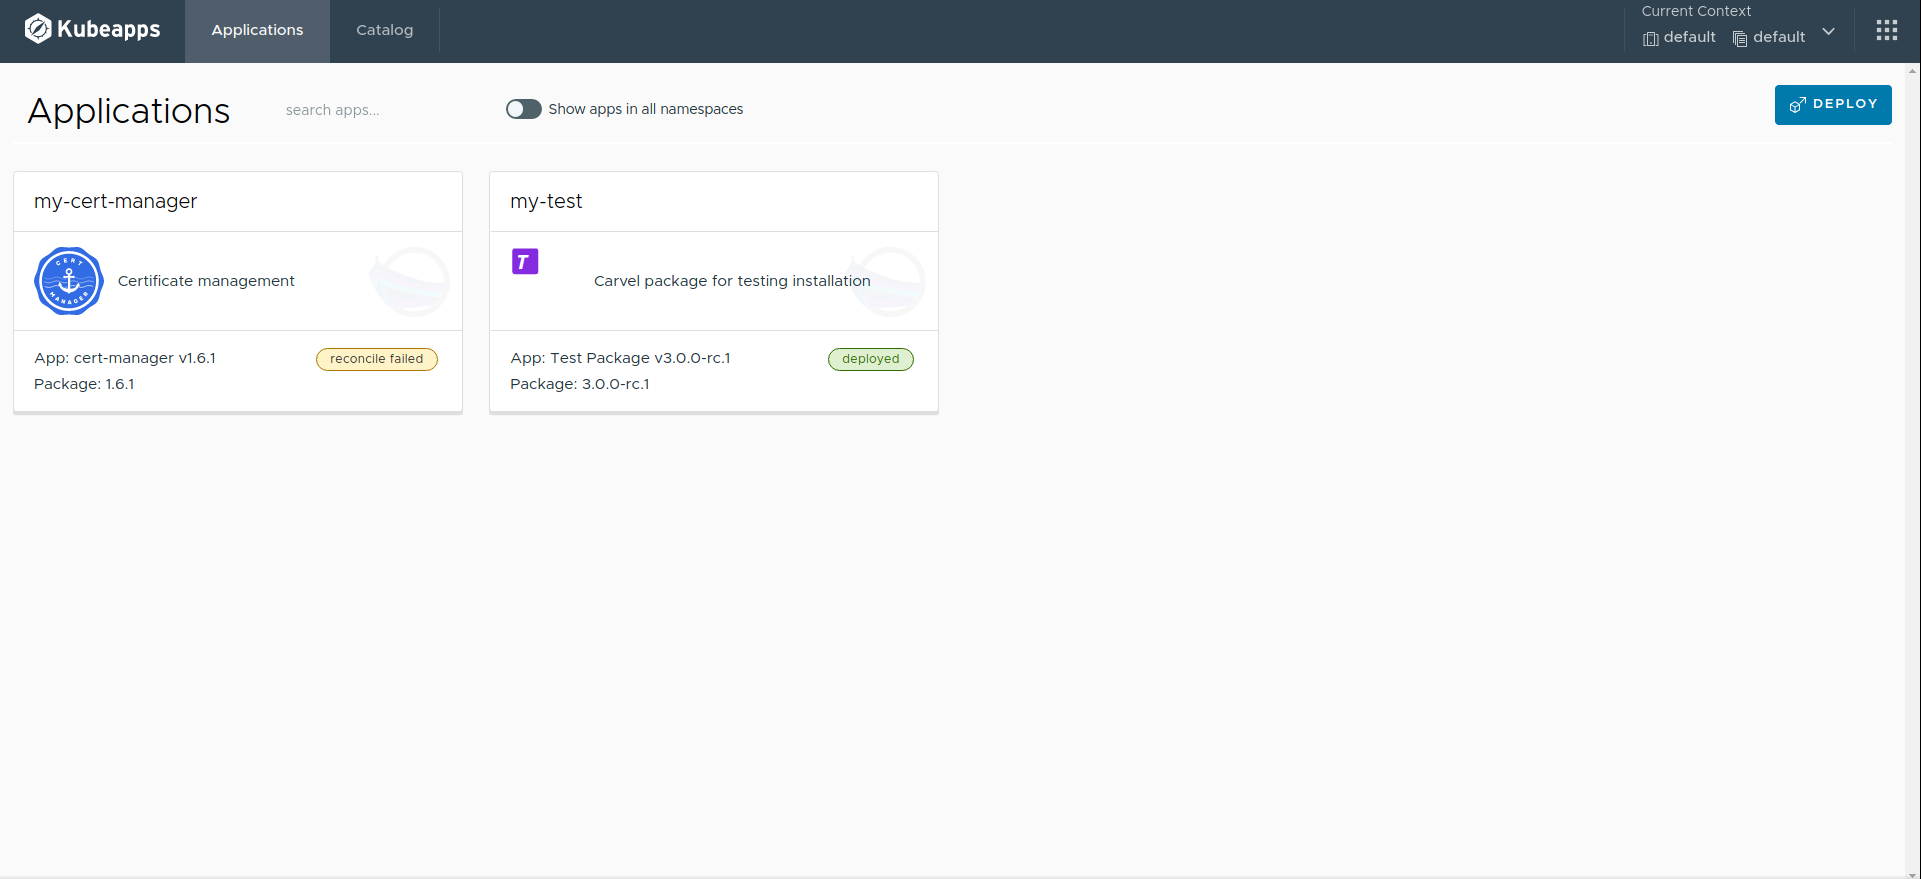
Since the reconciliation process can eventually fail for several reasons, this page will show the current status of each application. If it is deployed it means that the application is successfully running in the cluster.
Next, click on the application you want to view, for example, my-test to go to the details page, as depicted in the following image:
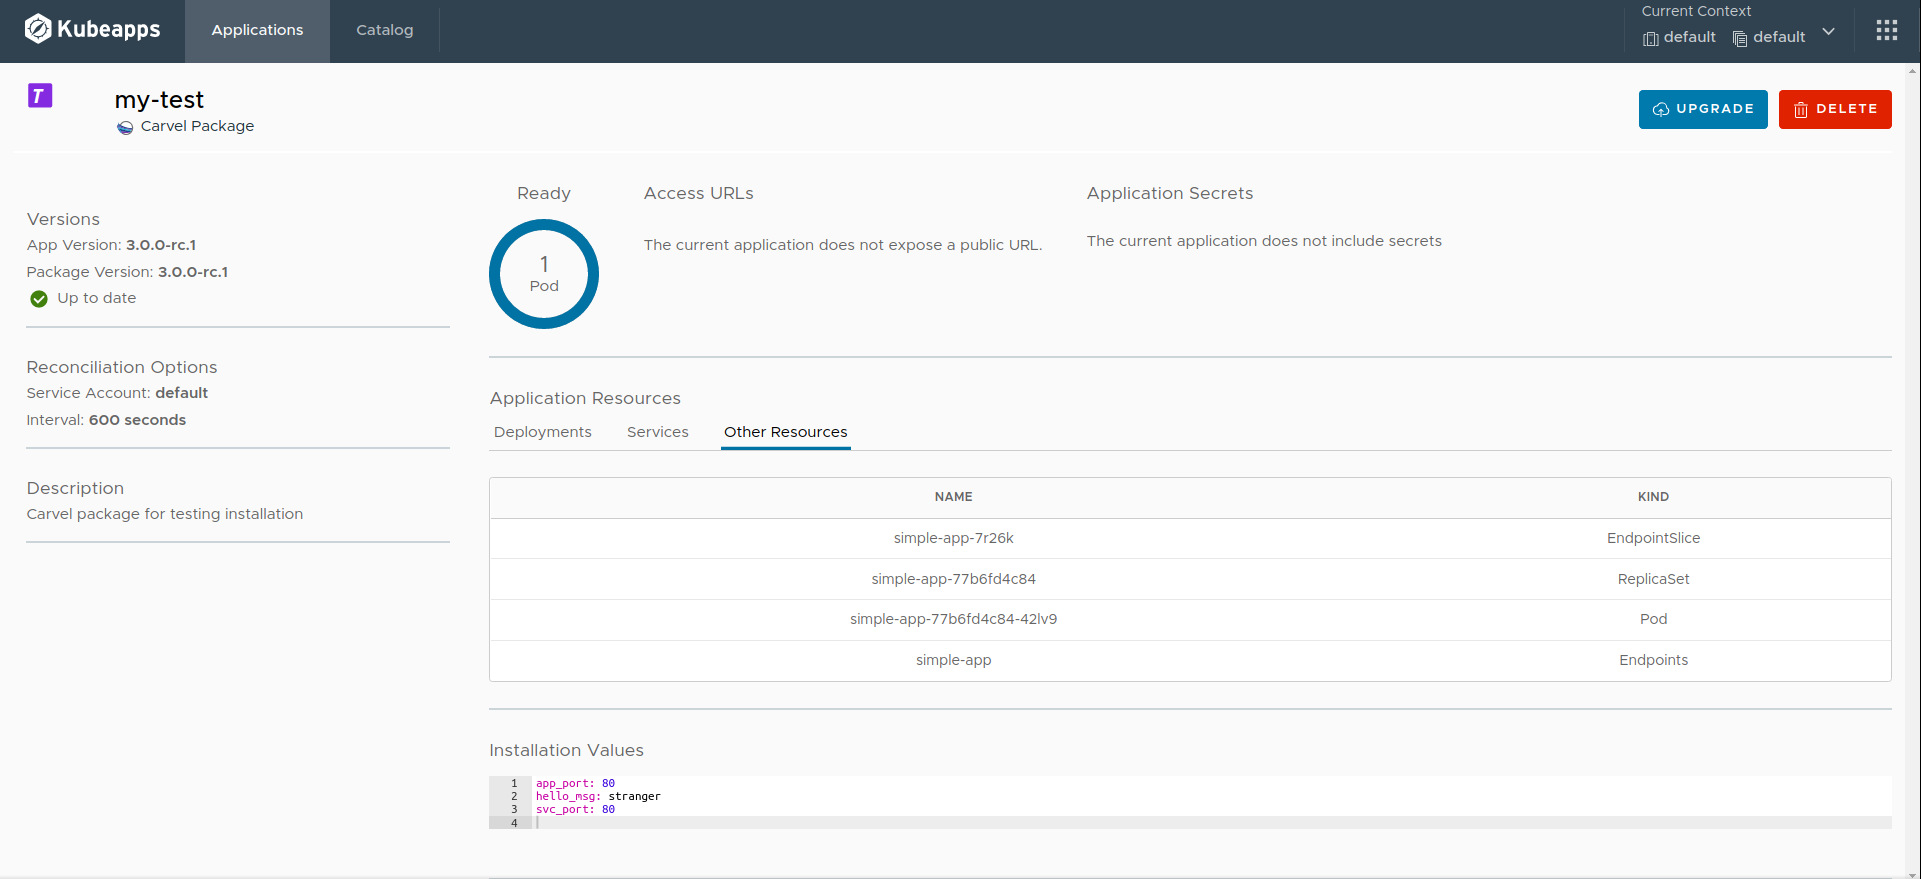
As in any other packaging format, this page will display those Kubernetes resources that have been created as a result of the Package installation. Besides, the current values are shown at the end of the page.
Next, you can click on the Delete button to uninstall the application or the Upgrade button to edit the values of the application or update it to another version.
NOTE: as opposed to Helm Charts, Carvel Packages cannot be rolled back, hence there is no
Rollbackbutton.
Finally, note that every Carvel Package installed through Kubeapps can also be managed by the
kapp
CLI using the kapp inspect -a <APPLICATION_NAME> command. For example:
kapp inspect -a my-test-ctrl
An example output of this command is:
Target cluster 'https://127.0.0.1:40903' (nodes: kubeapps-control-plane)

Resources in app 'my-test-ctrl'

Namespace  Name                         Kind           Owner    Conds.  Rs  Ri  Age
default    simple-app                   Deployment     kapp     2/2 t   ok  -   9m
^          simple-app                   Endpoints      cluster  -       ok  -   9m
^          simple-app                   Service        kapp     -       ok  -   9m
^          simple-app-77b6fd4c84        ReplicaSet     cluster  -       ok  -   9m
^          simple-app-77b6fd4c84-42lv9  Pod            cluster  4/4 t   ok  -   9m
^          simple-app-7r26k             EndpointSlice  cluster  -       ok  -   9m

Rs: Reconcile state
Ri: Reconcile information

6 resources

Succeeded
Conclusions 
This guide has covered how to manage Carvel Packages in Kubeapps, starting from how to configure Kubeapps itself , then how to add Carvel Packages Repositories , next how to browse and install Carvel Packages , and finally how to view the installed Carvel Packages .
Some additional resources and references include:
Finally, we are currently working on this kapp-controller plugin for managing Carvel Packages, so if you encounter any problems, please file an issue in the Kubeapps repository.