 Slack
Slack GitHub
 Twitter
Documentation
About Kubeapps
Tutorials
- Get Started with Kubeapps
- Using an OIDC provider
- Managing Carvel packages
- Managing Flux packages
- Kubeapps on TKG
How-to guides
- Using the dashboard
- Access Control
- Basic Form Support
- Custon App View Support
- Custom Form Component Support
- Multi-cluster Support
- Offline installation
- Private Package Repository
- Syncing Package Repositories
- Using an OIDC provider with Pinniped
Background
Reference
About the project
Managing Flux V2 Packages with Kubeapps 
NOTE: This guide is about a feature that is under active development and, therefore, not yet ready for production use. The information herein stated is subject to change without notice until we reach a stable release.
Table of Contents 
Introduction 
Historically, Kubeapps was initially developed to solely manage Helm Charts on your Kubernetes clusters. However, it has evolved to support multiple formats, such as Carvel Packages and Helm releases via Fluxv2 .
TIP: Find more information about the architectural evolution at this video and this technical documentation .
Flux is a set of continuous and progressive delivery solutions for Kubernetes that are open and extensible. In particular, the Flux helm-controller allows you to manage Helm chart releases declaratively with Kubernetes manifests. Similarly, the Flux HelmRepository can be used to manage Helm repositories declaratively.
This guide walks you through the process of using Kubeapps for configuring and deploying Helm charts via Flux.
Installing the Flux controllers in your Cluster 
NOTE: This section can safely be skipped if you already have Flux installed in your cluster.
In order to manage Flux Helm releases in Kubeapps, you will first need to install the Flux controllers in your cluster.
In most situations, people use Flux to declare all their resources in a Git branch which Flux then reconciles on the cluster, but Flux also supports HelmRelease and HelmRepository custom resources. Refer to the
Flux installation instructions
for general installation instructions. If you simply want to test the Kubeapps Flux support, you can install the flux components without any Git branch or even the Flux CLI with a
dev install
:
kubectl apply -f https://github.com/fluxcd/flux2/releases/latest/download/install.yaml
After running this command, you should have everything you need to try out Kubeapps’ Flux support. You can check on the progress of the Flux installation with:
kubectl --namespace flux-system get pod
Quick overview of the relevant Flux Custom Resources 
The two custom resources that are relevant for our Kubeapps integration are:
- HelmRepository
stores a reference to a traditional Helm repository and fetches the repository index on an interval, similar to Kubeapps’ built-in
AppRepositoryresource. - HelmRelease defines the intended state of a Helm release, supporting a multitude of features, the most important of which for our purposes is a semver version option, so that the Flux reconciliation process will always ensure that the latest matching version is installed.
Using Kubeapps to manage Flux Helm releases 
Configuring Kubeapps to support Flux Helm releases 
As with any other packaging format, the Flux support is enabled in Kubeapps by means of a plugin.
To enable the Flux packaging support, in the
values.yaml
file, edit the packaging option as follows:
packaging:
  helm:
    enabled: false
  flux:
    enabled: true
TIP: Please refer to the getting started documentation for more information on how to install Kubeapps and pass custom configuration values.
NOTE: You cannot run Kubeapps currently with both the Helm and Flux packaging support, since they both operate on Helm releases.
Installing a Helm Repository 
NOTE: Currently, Kubeapps does not offer any graphical way to manage Flux Helm Repositories . Therefore, you will need to install the helm repository manually.
As an example, you can create the manifest for a Flux HelmRepository referring to the Bitnami Helm chart repository with:
cat > repo.yaml << EOF
---
apiVersion: source.toolkit.fluxcd.io/v1beta1
kind: HelmRepository
metadata:
  name: bitnami
  namespace: default
spec:
  url: https://charts.bitnami.com/bitnami
  interval: 10m
EOF
and apply it with:
kubectl apply -f repo.yaml
This creates the Flux HelmRepository in the default namespace that will sync the Bitnami chart index every ten minutes. Any user who can read HelmRepository resources in the default namespace will be able to create HelmRelease resources referring to charts in this repository in any namespace to which they have sufficient RBAC.
Creating a service account 
Since the Flux system reconciles a HelmRelease in the background, we need to create a service account to use when creating a Helm release via Flux. This service account is created in the namespace where you intend to install the package (specifically, where the HelmRelease resource will be created).
cat > kubeapps-user-service-account.yaml << EOF
---
apiVersion: v1
kind: ServiceAccount
metadata:
  name: flux-reconciler
  namespace: kubeapps-user-namespace
automountServiceAccountToken: false
---
apiVersion: rbac.authorization.k8s.io/v1
kind: RoleBinding
metadata:
  name: flux-reconciler
  namespace: default
subjects:
- kind: ServiceAccount
  name: flux-reconciler
  namespace: kubeapps-user-namespace
roleRef:
  kind: ClusterRole
  name: admin
  apiGroup: rbac.authorization.k8s.io
EOF

kubectl apply -f kubeapps-user-service-account.yaml
Note that this service account will have admin access to the namespace only and so will be able to read/write most resources in the namespace, including adding other roles and rolebindings. If your package includes cluster-wide resources such as CRDs or ClusterRoles, you will need to update the above to use a ClusterRoleBinding with a different cluster role, such as cluster-admin. See
Kubernetes user-facing roles
for more info about the roles.
Installing a Package 
Installing a Flux Package in Kubeapps is very similar to installing any other package (such as a Helm Chart) in Kubeapps.
TIP: Please refer to the user documentation for more information on how to use Kubeapps as a user.
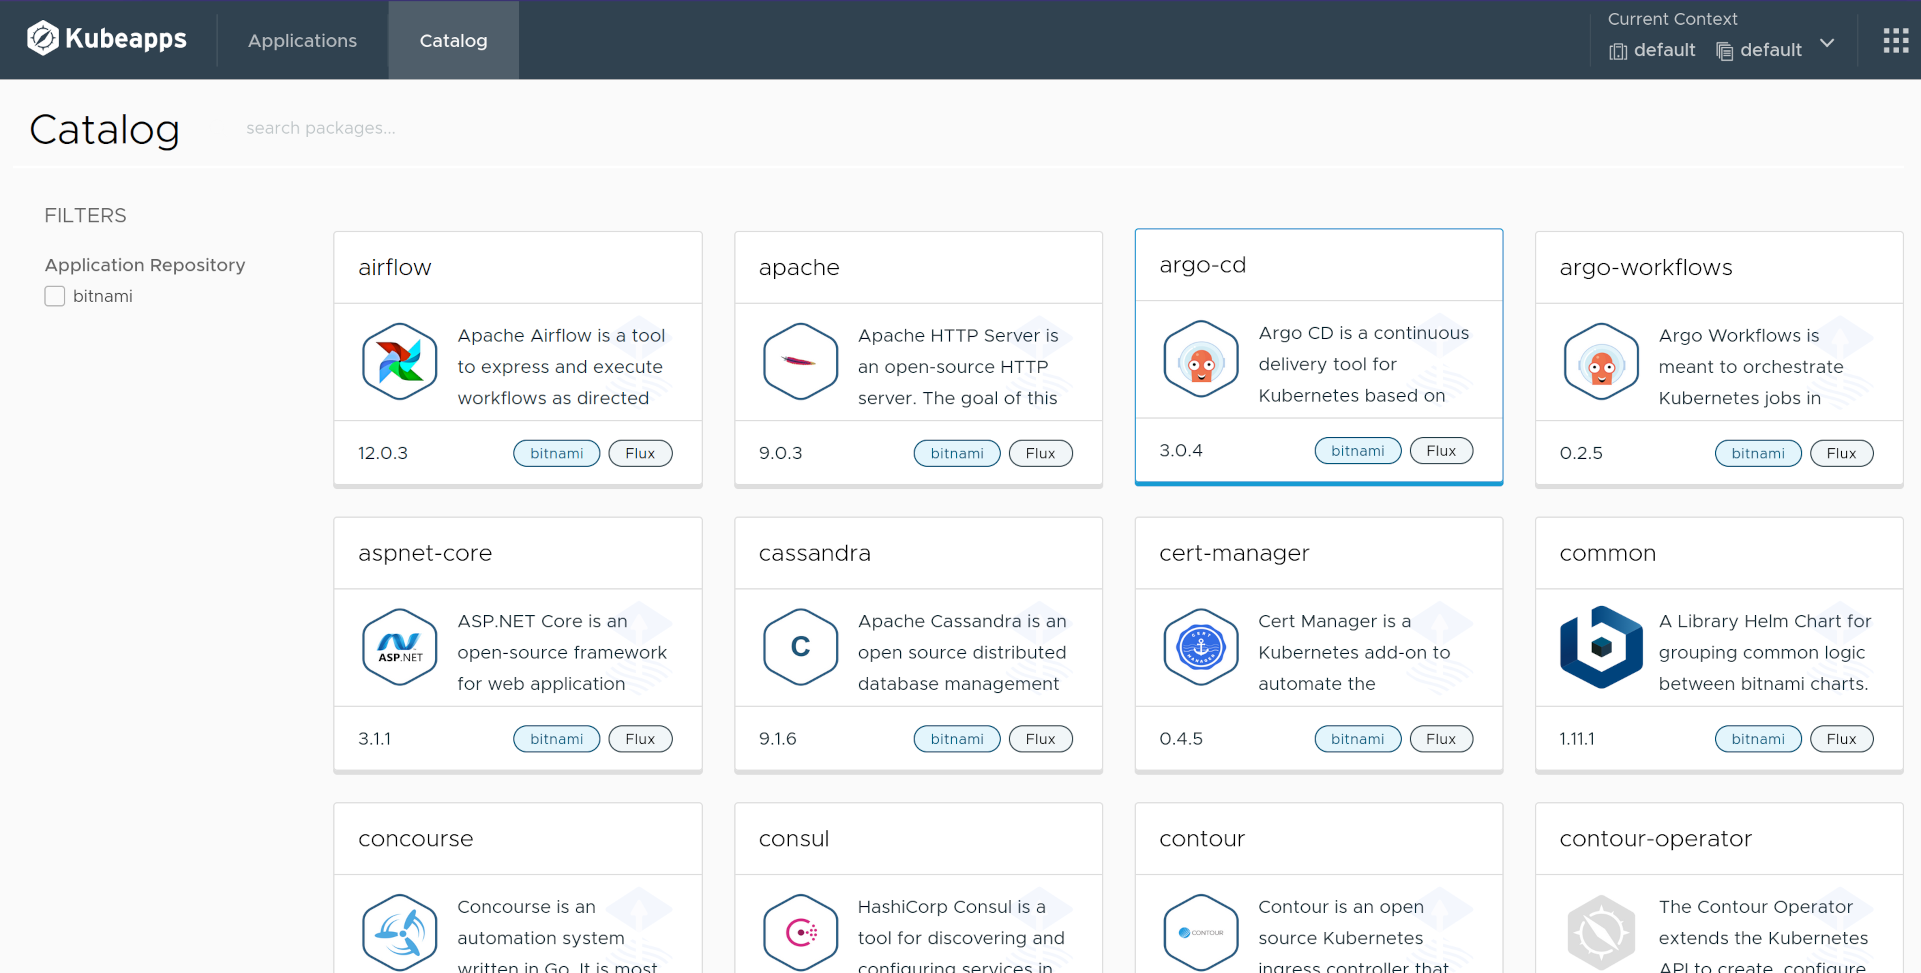
Assuming that a Flux HelmRepository, such as the Bitnami repository above, is already installed in the cluster, you can simply go to the Catalog tab and select the package you want to install.
The following image depicts the catalog page with a set of packages from the above Bitnami HelmRepository.
Next, select any package you want to install, for example, Apache, then click Deploy to see the install form as depicted below:

A big difference with respect to other packaging formats is that you must select a ServiceAccount to be used for installing the package. This is because Flux, similar to
Carvel
, will carry out the installation as well as upgrades in the background and so cannot rely on doing so as the user. See
Creating a service account
above.
In Kubeapps, a dropdown will allow you to select which ServiceAccount you want to use, such as the flux-reconciler service account created above.
NOTE: As a consequence, the user logged in Kubeapps will need RBAC permissions to perform a
listoperation onServiceAccountobjects.
TIP: For the Apache package, ensure that the ServiceType is set to an option supported by your cluster. For instance, for a local Kind cluster, you will want to choose
ClusterIPrather thanLoadBalancer.
Finally, after clicking the Install button, the Flux HelmRelease be installed in the cluster. At this moment, Flux will perform the required actions to deploy the related Helm chart and its related resources. This process is known as reconciliation. You can check the CLI for more details about the reconciliation:
kubectl -n kubeapps-user-namespace get helmrelease
NAME          READY     STATUS                       AGE
test-apache   Unknown   Reconciliation in progress   8s
Viewing the Installed Packages 
Viewing the installed Flux Packages in Kubeapps is the same experience as viewing any other installed package (such as a Helm Chart) in Kubeapps.
TIP: Please refer to the user documentation for more information on how to use Kubeapps as a user.
Go to the Applications tab to see every Application that has been installed in the cluster. Click on show apps in all namespaces to view the ones currently installed in every namespace of the cluster.
The following example shows an example of the Applications page with Apache installed as a Flux package:
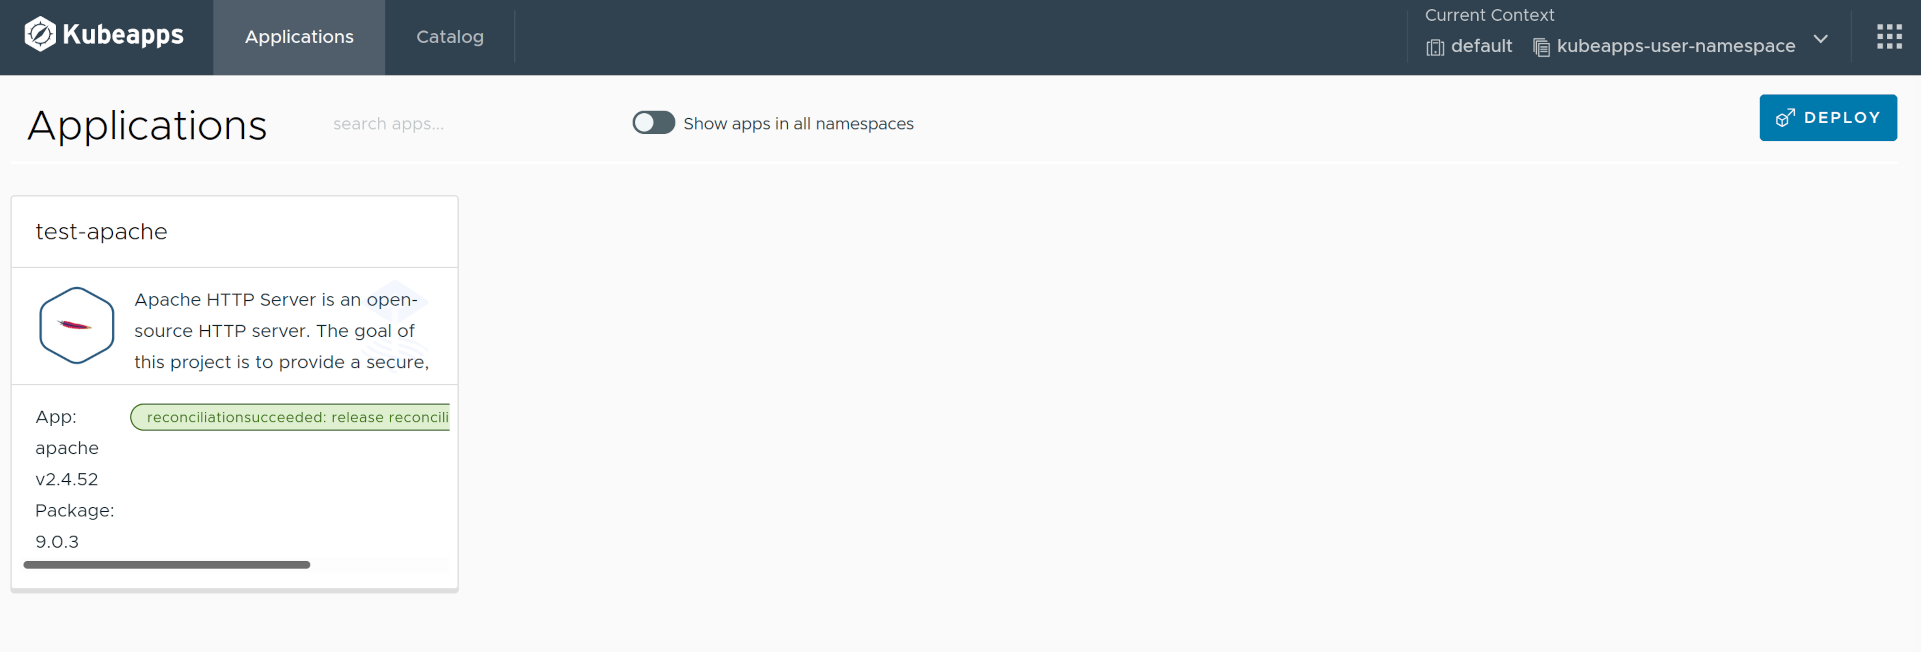
Since the reconciliation process can eventually fail for several reasons, this page will show the current reconciliation status of each application.
Next, click on the application you want to view, for example, test-apache to go to the details page, as depicted in the following image:
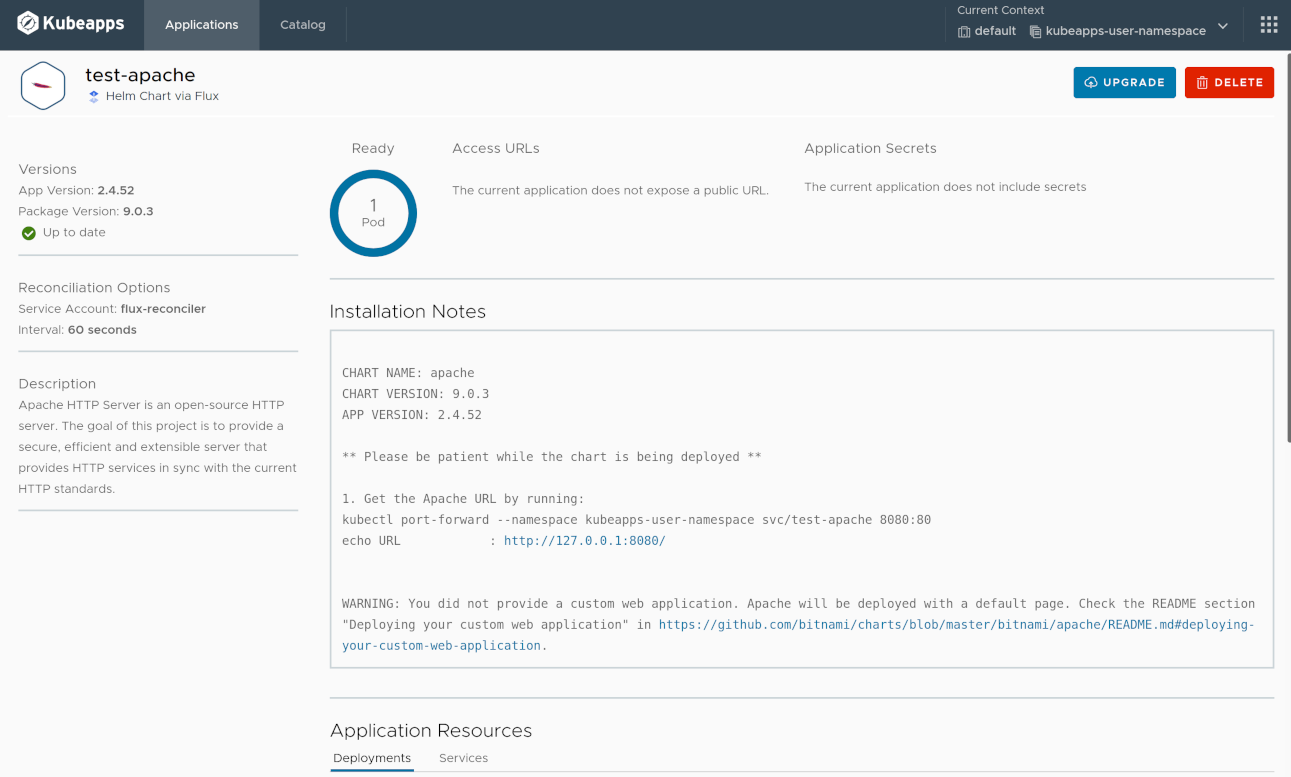
As in any other packaging format, this page will display those Kubernetes resources that have been created as a result of the Package installation. Besides, the current values are shown at the end of the page.
Next, you can click on the Delete button to uninstall the application or the Upgrade button to edit the values of the application or update it to another version.
NOTE: as opposed to Helm Charts, Flux Packages cannot be rolled back, hence there is no
Rollbackbutton.
Finally, note that every Flux Package installed through Kubeapps can also be managed by kubectl or the
flux
CLI using the flux get helmrelease command. For example:
flux get -n kubeapps-user-namespace helmrelease test-apache
NAME            READY   MESSAGE                                 REVISION        SUSPENDED
test-apache     True    Release reconciliation succeeded        9.0.3           False
Conclusions 
This guide has covered how to manage Flux Packages in Kubeapps, starting from how to configure Kubeapps itself , then how to add Helm Package Repositories for Flux, next how to browse and install Flux Packages , and finally how to view the installed Flux Packages .
Some additional resources and references include:
Finally, we are currently working on this Flux plugin for managing Flux Packages, so if you encounter any problems, please file an issue in the Kubeapps repository.